

How To Make A Drawstring Makeup Bag

Can you lot believe it'due south already Day 11 of this yr'southward 12 Days of Christmas? I Honey today'due south freebie; nosotros accept three sizes of drawstring pouches for you. They make the all-time travel makeup bag, the perfect size bag to conduct around 400 LOL dolls, a slap-up LEGO bag,….or possibly that's simply what we're using the three sizes for at my house, haha!
You lot can download your Drawstring Pouch pattern over in our freebies section, and so head dorsum here for the tutorial!
SUPPLIES:
- one (20″ & 30″ numberless) to 1.5 yards (42″ bag) of 44″ wide fabric for principal
- 1 (twenty″ & 30″ bags) to 1.v yards (42″ bag) of 44″ wide fabric for lining
- 2.5 (xx″ bag) to iv.5 yards (42″ bag) of double fold bias tape (or you can make your own!)
- drawstring (you lot can use nylon cord, ribbon, brand your own with coordinating fabric, etc.!)
- velcro, push button, snap, etc. to use for closure (I would recommend snap or velcro for ease of apply)
- optional: cord caps or similar for end of drawstring
- basic sewing tools: thread, pins/clips, turning tool, etc.
Permit'S Get STARTED!
i/two″ seam allowances included.
Step 1: PREPPING
Go catch the pattern Here! The pattern is 100% gratis, but you lot do need to add information technology to your cart and cheque out. Then, it volition ever be available to download from your account. The pattern is a no trim pattern; if you need help putting the pattern together, pop over to the faqs and troubleshooting folio or ask in our Facebook group .
Print and assemble the pattern. Impress layout shown beneath:
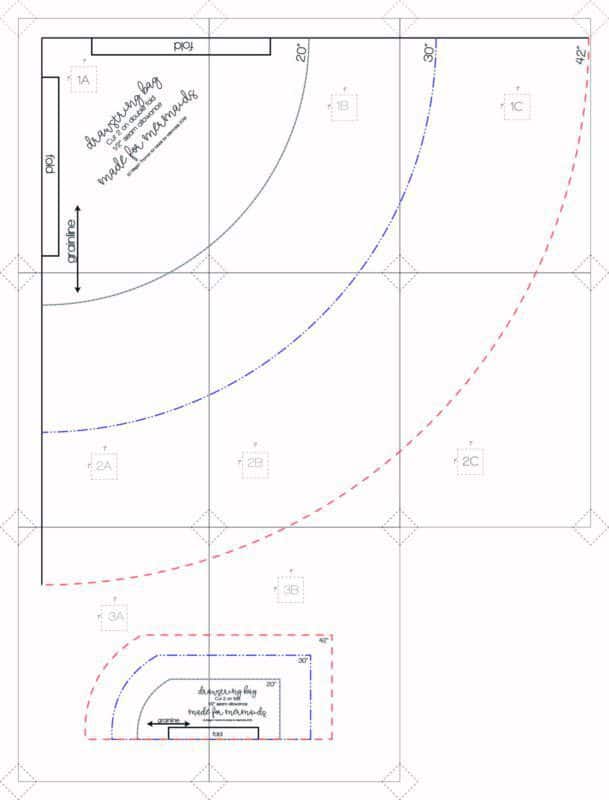
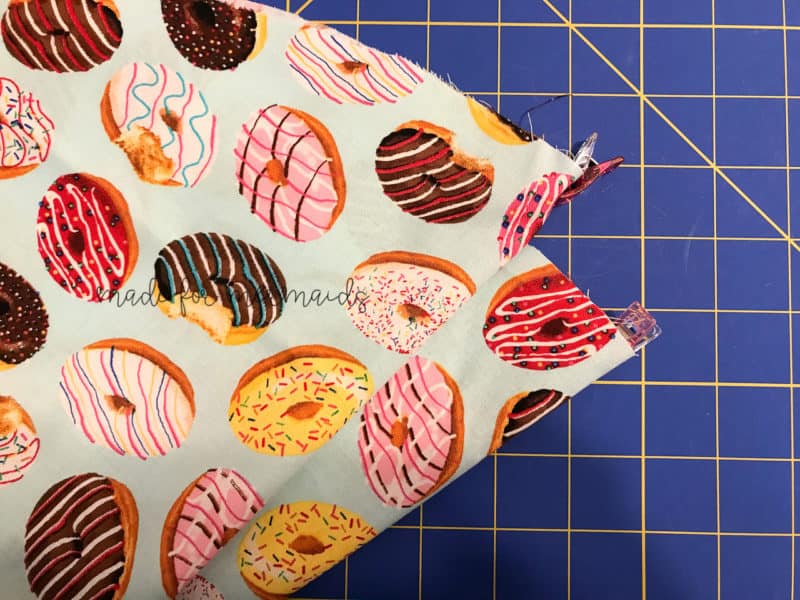
For all sizes, you will need to cut two circle pieces (1 principal, 1 lining), 2 flap pieces (ane main, 1 lining), double fold bias tape (or brand your ain binding), and drawstring. You can utilise quilting cotton fiber for these, only note that the opening volition not close up as tightly as with apparel woven, nylon, etc. due to bulk. I used quilting cotton in the tutorial and then you lot volition meet what the opening looks like.
You lot may demand to make slight adjustments based on cutting/printing precision, but binding measurements for the casing pieces are:
- 20" circle – 34" 10 2"
- 30" circumvolve – 50" ten 2"
- 42" circle – 68.5" ten 2"
You will also need ii shorter pieces of binding for the flap closure.
**Notation: some of my pictures are of a smaller sample version so it volition not exist actual size. At that place are two slightly different options for construction; the main difference between the two is that the opening on selection 1 will be a fiddling more "open up" than the opening on option 2 due to bulk of fabric & binding. ***
Pace two: ASSEMBLING BAG
Choice 1: Fold both main and lining circles in half, with right sides together. Make a one" snip on either side of the middle fold line, on both circle pieces (y'all will have four 1″ snips in total). Place your main circle slice on summit of your lining circumvolve piece, with correct sides together, adjustment the i" slits.
Stitch a "v" shape around both slits, with a ane/2" seam assart. Trim seam allowance to ane/4", cutting to, merely non through, the signal of the "five" shape.
Turn correct side out and press. Peak stitch effectually "v"on both sides. Baste both circumvolve layers together, all the way around.
OPTION 2: Fold chief circumvolve piece in half. Marker mid point on either side. For option ii, purse assembly will exist continued in step iv.
Stride three: CREATING CASING
OPTION 1: Cut two strips of binding if y'all haven't already. Fold raw edge of binding toward wrong side 1/two″. With right sides together, pin or clip bias bounden all the way around 1 side of circle. Stitch with 1/2" seam allowance.
Trim seam assart to 1/4". You can also make several snips to, merely not through, your stitches to assist your circle lay flatter. Fold bias bounden over, and pin or clip in place. Sew in place one/two" from edge. This is your drawstring casing. Repeat for other side.
OPTION two: Cut two strips of bounden if you lot haven't already. Fold raw border of binding toward incorrect side 1/2″. Place binding one/two″ from ane of your mid points, matching raw border of bounden to raw edge of circumvolve. If using pre-made bounden, unfold and then that your bounden is 1″ wide.
Sew with 1/2″ seam allowance. Echo for reverse side. You lot should have i″ between binding/casing openings.
Step 4: ASSEMBLING BAG Connected
OPTION ane: Skip to step 5.
Pick 2: Place lining fabric top main fabric, with right sides together. Stitch circles together, with 1/ii″ seam allowance. Leave a 2″ opening so that you can turn your circles right side out.
Trim seam allowance to 1/four″. Do not trim where your opening is. Turn circles right side out.
After turning correct side out, press. Yous may wish to top stitch, or you may choose to just close your opening. I like to topstitch, specially for the numberless my kids volition use, just to give the casing a little extra security.
Stride 5: INSERTING DRAWSTRING
OPTIONS 1 & 2: Insert drawstring through each casing. You can take 2 drawstring pieces that tie on both sides, or you could take one continuous drawstring that goes through both casings but tie on simply one side. I used a safety pin to guide my drawstrings through the casings, and I used cord caps on each finish for decoration, simply also to go along them from being pulled out of the casing. 🙂
Step 6: Amalgam FLAP
OPTIONS one & 2:Gear up bag to side. Baste main and lining flaps together, with wrong sides together. Pivot or clip bias binding around the curved edge of the flap slice. Sew with one/2" seam allowance. Trim seam allowance to 1/four". You can also make several snips to, simply not through, your stitches to aid your flap lay flatter.
Fold binding over to forepart. Stitch in place about i/ii" from border. Fold end of bias binding back, incorrect sides together, past one/4". Pivot or prune bias binding along top edge of flap piece, matching raw edges. Stitch with one/2" seam assart. Fold bounden over to front. Run up in identify virtually 1/2" from border.
Step seven: ATTACHING FLAP
OPTIONS 1 & 2:Discover eye of one side of circle. Identify a pin or prune to mark center. Observe center of flap slice.
Using your center markings, pin the top edge of the flap piece 3" from edge of circumvolve. Stitch tiptop edge binding of flap piece to purse.
Step 8: CLOSURE
OPTIONS 1 & 2:Identify a snap, Velcro, push, etc in the eye of flap piece, about i" from bottom border of flap piece. Place the reverse side of the snap, Velcro, etc. 1.5" from the border of the other side of the circumvolve.
All finished! Use your new drawstring pouch to hold whatever number of times!
For a cute gift idea for piffling ones, you can even turn the inside of the pouch into a footling playmat for dolls, cars, etc. I used minor scraps and some hot gum to add fun lilliputian "article of furniture" details to the inside of my daughter's drawstring pouch. Most of them are just basic shapes so she can use her imagination. She was so excited to take everything she needed to play right in the bag already!
Y'all tin can also skip the flap/closure if you'd similar! Even without the closure, the drawstring pouch makes a great travel purse for items like lingerie that you'd like to go on separate!
DECEMBER 1 – 12, 2018
DAY ane –BARNACLE BUDDY Handbag
24-hour interval 2 – FUR POM POM
DAY 3 – Bowl COZY
Mean solar day 4 – FELT Bake Ready
DAY 5 – CLARA APRON
DAY 6 – FABRIC GARLAND & NECKLACE
DAY 7 – POCKET PILLOW WITH CUT FILES
Twenty-four hours 8 – FELT ORNAMENTS
DAY ix – CLOTH NAPKIN
DAY 10 – LOG CARRIER

How To Make A Drawstring Makeup Bag,
Source: https://www.madeformermaids.com/drawstringpouchtutorial/
Posted by: stultsfering.blogspot.com
0 Response to "How To Make A Drawstring Makeup Bag"
Post a Comment